Huffman Encoding
Huffman Encoding is one of the earliest schemes used in text compression. This
reduces the total number of bits required for transmission of a message. This
process first requires analyzing the text to compress and then based the
statistics of the characters in the processed text we encode the letters.
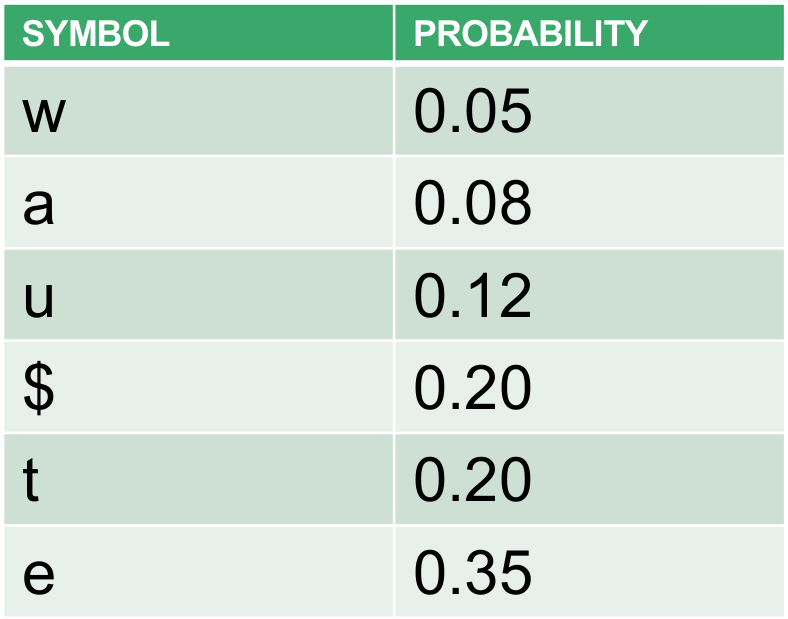
Consider a message with the following symbols: t, u, $, e, a, w
Since we have 6 symbols, conventionally, we would need 3 bits for each symbol.
So, something like "tweet" would take up 15 bits of data. However, this method
of encoding doesn't take into account the frequent of the letters. Suppose the
probability of the occurrence of each symbol in our example is known to be the
following:
Building a Huffman Tree
-
Organize the Data: Start by arranging all the symbols in increasing
order based on their probabilities or frequencies. This means the symbols
with the smallest probabilities should be at the beginning of your list.
-
Select Minimum Probability Symbols: From your organized list, pick out
the two symbols that have the smallest probabilities.
-
Create Initial Trees: For each of these two symbols, build a binary
tree. These initial trees should each have just one node that represents one
of the selected symbols.
-
Combine into Sub-Tree: Construct a new binary sub-tree using these two
one-node trees. The root node of this new sub-tree should be a composite
node, holding the combined probability of the two initial symbols. The two
one-node trees will be its left and right children.
-
Update the List: Add this newly constructed sub-tree back into your
original list, ensuring to keep the list in increasing order of
probabilities.
-
Repeat the Process: Continue with this process, repeating steps 2
through 5. Each round, you'll combine the two smallest probabilities into a
new sub-tree and update your list accordingly.
-
Finalize the Huffman Tree: The process comes to an end when only one
tree remains in your list. This final tree is your completed Huffman tree.
Here is a great animation from Tom Scott on YouTube on this topic: Huffman
Encoding by Tom Scott
Note, he uses frequency rather than probability but they are the same the same
idea. He also starts at the bottom of the list rather than the top but that's
again the same idea.
Implementation of the Huffman Encoding
In the implementation, I decided to use frequency rather than
probability since I feel comparing integers would more precise and
efficient.
Here's the Github link: Huffman Encoding
Repository
HuffmanTree Class
The first thing we create is the HuffmanTree class which is a version of the
binary tree. We store the left, right, character, frequency in each
node. To serialize the tree, I've decided to use pre-order traversal and write
it to an ASCII file so that the tree can be by deciphered by other programs as
well.
HuffmanEncoder Class
This is the main program that does all the math. It has a bunch of method to do
different things but it doesn't handle actually doing them. In
HuffmanCompressionDriver, the encodeFileBinary for example, uses the
methods in this class.
- Create the frequency table.
- Build the huffman tree from the frequency table.
- Generate the huffman codes from the huffman tree.
Then the HuffmanCompressionDriver handles things like reading and writing to
a particular file, etc.
HuffmanCompressionDriver class
This class is the user interface and decided which methods are to be called in
what order. This also handles all the I/O operations, converting from string to
binary and vice-versa, etc.
Conclusion
In my particular version of the compression algorithm, I found it saved about
25% of the space on disk, however, it's more useful for larger bodies of text
since the tree that is also required is rather large.
Things I learned:
- Building a binary tree from useful data.
- Serializing and De-serializing a binary tree.
- Writing binary data to a file using java (especially non-byte sized data).
- Parsing user input in Java from CLI options.